Making a paper cup penguin craft is a fun and simple activity that children will enjoy! Preschoolers will practice cutting and glueing, which helps improve their hand-eye coordination and fine motor skills. Using recycled materials like paper cups is a fun way to teach kids about the benefits of recycling too.
This is ideal for winter-themed projects or for a cosy day inside. Whether you’re a teacher seeking a classroom activity or a parent looking for a weekend craft, this penguin craft is guaranteed to bring joy.

Related Recycling Crafts:
Supplies You Need
- A black paper cup (or a white paper cup and black paint)
- White, black and yellow construction paper
- Craft glue
- Scissors
Step By Step Guide To Make Paper Cup Penguin Craft
Step 1: Prep the Paper Cup

You can start with preparing the paper cup. If you can’t find a black paper cup, start by painting the outside of the paper cup with black paint.
This will be the penguin’s body. Allow the paint to dry before moving on to the next step.
Take a piece of white construction paper and cut out an oval shape for the penguin’s belly. You can easily do it by folding a piece of paper as shown above.
You can make it as large or small as you like, but make sure it’s big enough to cover the front of the cup. Glue it to the centre of the cup.
Step 3: Create the Eyes
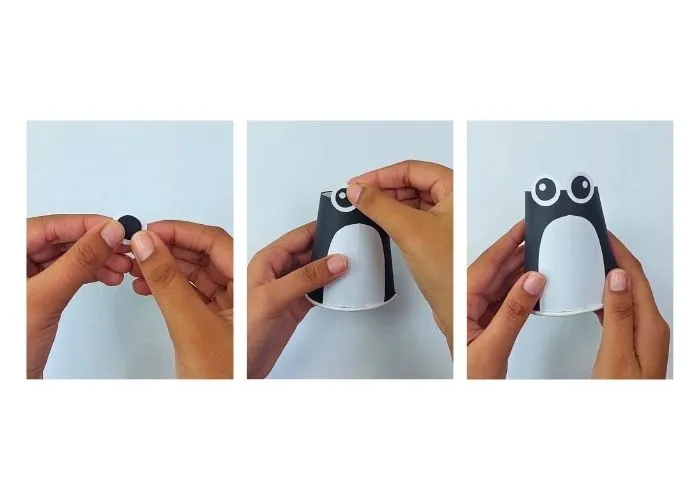
Cut out three circles from white and black construction paper to create the penguin’s eyes. Glue them on to the bottom of the cup.
Step 3: Create the Flippers

Next, take some black construction paper and cut out two small ovals or triangle shapes for the penguin’s flippers. Glue them to the sides of the cup, slightly angling them out for that adorable penguin look.
Step 4: Make the Beak

Cut a small triangle out of yellow construction paper for the penguin’s beak. Glue it just above the belly area on the front of the cup.
Once everything is glued on, let the penguin dry for a bit.
Step 5: Add the Feet

You can make the feet using the yellow construction paper. Simply Draw a circle that matches the size of the paper cup and add two webbed feet. Then, attach it to the bottom of the cup with glue.

Here you have a cute penguin. Add more details as you want. We’d love to see how yours turns out!

Leave a Reply